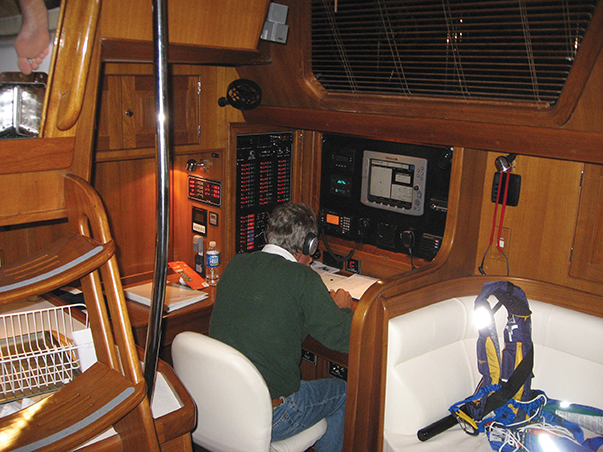
Five ways to make the signal you transmit from your SSB clearer and more reliable. Previously published in BWS.
We were on a passage from the Canary Islands to the Caribbean Sea. The night we reached the halfway point across the pond, we fired up our ICOM and tuned into WOO in New Jersey, which was one of AT&T’s ship to shore radio centers. We got the operator from 2,000 miles away, who tuned her antenna for our location and then placed a telephone call for us so we could tell our families that all was well and that we were making good progress.
That night, propagation was excellent so we stayed on 12 megs and trolled around the usual frequencies until we found a couple of botats we knew chatting in the Caribbean 1,000 miles away. We chimed in to say hello and learned that a group of our friends would be gathering in Grenada for Thanksgiving. Cool.
The next morning, we tuned into our local coffee klatch on 4 megs and spoke with three other boats that were sailing more or less in company with us but were hundreds of miles apart. We chatted about the weather, gave our current positions and wished each other well.
Now, in the days of sat phones, the ship-to-shore radio to telephone business has gone the way of the dodo. But SSBs are still a fine way to communicate between cruising boats, especially with all of the SSB radio networks out in the world’s best cruising grounds. And, they provide, through SailMail, an inexpensive and mostly reliable way to send and receive email and get weather forecasts.
These days, many rallies and offshore races either require or strongly suggest that skippers carry and know how to use a proper marine single sideband radio. While these radios are not hard to use, they do have some quirks that can affect their performance, or the strength of the signal that you blast out into space in the hopes that your friends, fellow ralliers or the Coast Guard can hear you.
If you are not a radiofile, then it makes all the sense in the world to have your new radio, tuner, antenna and modem (for email) installed by a trained professional. Once you get the hang of using your SSB, you’ll discover how useful it can be, particularly if you are sailing in an event or buddy boating with a number of other cruisers.
But, even when you have the radio properly installed and are confident you know how to use it, there are always gremlins that creep into the system along the way and after some time in the marine environment. Here are five common problems you may have to deal with to make sure you are broadcasting at your full 150 watts and getting out the clearest signal possible.

Basic SSB Propagation Single Sideband radios broadcast in two ways, ground wave and sky wave. When you are communicating with another radio operator within about 200 miles or, the signal they receive will be the ground wave. These are not just line of sight and can travel over the curve of the earth, but not far. In general, you will use 4 and 6 megs for short range transmissions. The sky wave when using higher frequencies bounces off the ionosphere and it is the bounce that gives the transmission long distance communication. When conditions are good a sky wave may bounce two or three times and that is what allows it to transmit over greater distances. The higher the frequency, the longer the skywave and the farther away its reach. Normal traffic for cruisers will be in the 8 to 22 meg range.
1. CONNECTIONS
Your boat is constantly moving and you and your crew are always rummaging through lockers looking for gear and equipment. Wires can get knocked, plugs can get bumped and heavy or sharp gear can find its way into places where it can cause problems.
Plus, in the marine environment, where the air is naturally corrosive, connectors, plugs, fasteners and anything carrying electricity are destined to develop current inhibiting build-ups of corrosive coatings.
So, if you find that your radio’s signal is getting weak and your friends tell you that you are coming in faintly and not at all at long range, the first place to look for problems will be at all of the connectors from the back of the radio to the tuner, ground plane and antenna. Take them apart, clean them thoroughly until they are corrosion free and then reassemble them with care. Self-amalgamating electrical tape wound tightly around new, dry, clean connections will help delay the inevitable for a long time.
2. GROUND
When your radio was installed, the installer probably added a ground for the radio in the form of a ribbon of copper that was attached to the boat’s bronze through-hulls, keel bolts or any other metal connection that links to the water around the hull. Or, you may have had a Dyna-plate (or two), installed under the water, which will provide an excellent ground.
The purpose of the ground is to provide the radio and its antenna with what is called a counterpoise. Basically, the ground provides the antenna with a counterbalance that enables it to deliver its full amount of power. With no counterpoise, or with a poor one, the antenna will be playing with one hand tied behind its back and your signal will be feeble.
To make sure the ground is working properly, you have to inspect it thoroughly. Check for bad or corroded connections. Make sure the ribbon of copper is well attached to bulkheads and the through-hulls or Dyna-plates. If all is well, then your transmission problems may lie elsewhere.
3. VOLTAGE
It is common for cruisers and those in events offshore to have radio schedules first thing in the morning when propagation is good and the crew is generally awake. And, it is not at all unusual for a few boats in the group to have weak signals or signals that sound as though the transmission was coming from underwater. Such garbled or weak signals can often be blamed on low voltage flowing from the house battery bank, which is often the case in the morning after using running lights, radar, nav instruments and a laptop all night.
The simple solution is to charge the batteries before using the radio. But, the long-term solution is to make sure your battery bank and charging system is able to keep up with your daily power needs. At 150 watts, you are draining the batteries at a rate of 12.5 amps while in broadcast mode. Talk for a long time and you can use a lot of battery power.
But the voltage problem may not be simply low batteries. If you suspect voltage is a problem, then use a multimeter to test voltage in the radio’s circuit from the battery bank to the breaker panel and at the power cable on the back of the radio. The batteries may be charged to the recommended 13.5 volts but you will likely see a degradation of voltage at the panel and in the power line. If it falls below 12 volts, you have a problem.
One solution will be to run the radio’s power circuit through its own breaker and directly to the house batteries or the on-off vacuum switch instead of through the main breaker panel. Upgrade the wiring to a heavier gauge and make sure all end fittings are large, clean and well secured. This should improve voltage to the radio and the signal you are broadcasting.

A Modern SSB System as spec’d by Steve Bowden at Sea Tech Systems that gives you worldwide wireless E–Mail & Weather. • ICOM M802 Marine HF SSB Radio with 150 Watts of Power, All ITU Channels & HAM; Frequencies Open, Built-in Digital Selective Calling (DSC), Digital Signal Processor (DSP), Variable Frequency Oscillator (VFO) Tuning & One-Touch E-Mail Access • ICOM AT-140 Automatic Antenna Tuner • SCS PTC-III USB HF SSB Radio Modem (TNC) • All required cables including a radio control cable (12-ft) with 2 ferrite filters that allows tuning of radio frequencies by AirMail (SailMail). • Marine Radio Software Collection CD including AirMail Software for SailMail & Winlink, ViewFax, ITS HF Propagation, & “Marine Single Sideband Simplified” By Gordon West
4. THE TUNER
The antenna tuner effectively “tunes” the antenna to match the frequencies you are broadcasting on and thereby optimizes the signal. If the tuner is not doing its job, the antenna will be tuned to only a single frequency and will be much less effective.
The tuner should be installed in a dry, safe place as close to the antenna as possible. If you have a whip antenna on the stern, the tuner should be in a cockpit locker or lazarette right next to the antenna. With an insulated backstay, the tuner should be below decks right at the transom and the cable should run from it to the insulated length of wire in as short a route as possible.
You can attach the antenna wire to the backstay below the insulator with electrical tape. But, using one inch offset brackets to keep the antennas away from the stainless steel stay reduces interference. The end of the antenna wire will be hose-clamped to the length of insulated backstay. Make sure this connection is corrosion free, tightly clamped and well secured with electrical tape.
Your radio may have a “Tune” button on it. Press this to see if you get a “Tune” message on the LCD screen. If so, you are all set. If not, then you have a problem.
You also can test a tuner problem in a limited way by broadcasting on all frequencies from 2 megs to 26 megs. You should see the same amount of voltage drop on your voltage meter on all frequencies. If not, the tuner is not working properly and you will need to check the connections and possibly call in a trained radio professional.
Tuners can fail due to wetness, rough treatment or power problems. Make sure the wiring in and out of the tuner is installed with drip loops so any water that gets onto the wires is interrupted before it can run along to the tuner’s connectors.
5. PRACTICE WITH THE PROS
When you install your new radio or buy a boat that has an SSB already installed, you will need help figuring out how the radio works, as the manuals that come with ICOMs and other brands are written for electrical engineers and professional radio technicians. They were not written for the rest of us.
A good radio tech will be able to get you up and going in a couple of hours so you can use the radio competently and understand how all of the pieces work together. Think of it as a process.
The 150 watt broadcast signal is a lot of energy and can have unintended effects on other equipment on the boat. You may find that you have one of the problems above. Or, you may find that the modem you have installed so you can use email creates interference when you are broadcasting. If it does, you may have to add small filters to the modem’s wiring to the radio.
The radio may not be compatible with fluorescent lights, which may add static or worse while you are receiving and transmitting. You will have to turn them off when you are using the radio and don’t rely on fluorescents at the chart table.
You may find that the radio’s signal confuses your autopilot and causes it to do strange things or quit altogether. If that is the case, you will have to install filters in the autopilot’s circuitry to prevent this from happening. You may get a similar reaction from the wiring to your refrigerator, and, you may hear the bilge pump kick in every time you broadcast or see the indicator lights on the break panel flicker.

Worldwide SailMail Stations SailMail in their own words: “The SailMail Association is a non-profit association of yacht owners that operates and maintains an email communications system for use by its members. SailMail email can be transferred via SailMail’s own world-wide network of SSB-Pactor radio stations, or via satellite (Iridium, Inmarsat, VSAT, Globalstar, Thuraya) or any other method of internet access (cellular networks, WiFi). The SailMail system implements an efficient email transfer protocol that is optimized for use over communications systems that have limited bandwidth and high latency. Satellite communications systems and SSB-Pactor terrestrial radio communications systems both have these characteristics.”
With a professional on hand, these strange side effects can be quickly identified and filters can be installed wherever necessary. It is even better if the radio professional is a cruiser or has taken part in events that have required SSBs.
If not, then the next step is to find a fellow boat owner who is an expert with his or her radio and get them to walk you through the full routine and give you a list of favorite chan

