Here’s a great article from Daniel Collins on how to get the most from your video cameras while sailing…
Since the very beginning of sailing, sea stories of giant waves and monsters as told by sailors have captivated and enthralled audiences the world over. These days with modern waterproof cameras we’ve had to temper some parts of our stories lest the films belie our embellishments. Nevertheless, the spirit of sharing the excitement, beauty and fascination of the sea remains strong. But as many would-be Jacques Cousteaus have found out, getting good video footage from a sailing trip can prove more difficult than expected.
Fortunately, it’s easier than ever to capture compelling and beautiful scenes from your trips and weave them into a narrative you’ll be proud to share with friends, family and the cruising community alike. Here’s a quick guide to getting the most from your sailing footage and capturing those envy-inducing shots.
CAMERA TYPES AND RECOMMENDATIONS
There are many waterproof cameras on the market today, but not all are created equal. Some of the most versatile and useful cameras out there are in the GoPro Hero series. Any of these are excellent cameras that will capture beautiful images when used properly, so don’t think you need to splurge on the Black edition just to get good footage. One of their main shortcomings, though, is that you can’t really see what’s in your shot unless you use the Wi-Fi link to your smartphone or add the LCD screen add-on, which eats battery power. This isn’t as big of a deal as it sounds, however, because the super-wide-angle lenses on the GoPros capture pretty much everything in the general direction you point the camera. It’s usually best to get these cameras up close and personal to the action—the further away they are, the less they see of what’s really important. There are a few exceptions to this, and we’ll cover some of them shortly.
These days, many new waterproof pocket cameras shoot pretty decent video, too. If yours is capable of 720p HD video, it’s probably up to par. So check out what you already own to see what it’s able to do. Also, buy a few large SD memory cards because video takes up a lot more storage space than photos.
Last but not least, don’t forget your humble smartphone. If you have a recent model smartphone, there’s a good chance that it, too, takes HD video. Storage on these is more limited than on other cameras, so you may want to take shorter clips and download them to your laptop sooner than you would with a dedicated video camera. But if it’s handy, smartphones can get some really wonderful shots that otherwise would have been missed entirely. If you’re concerned about water damage, LifeProof and other vendors make fully waterproof, submersible cases for the popular smartphones. These are also helpful because they will allow you to bring your camera on deck, or even into the water, without risking damage.
MOUNTING TRICKS
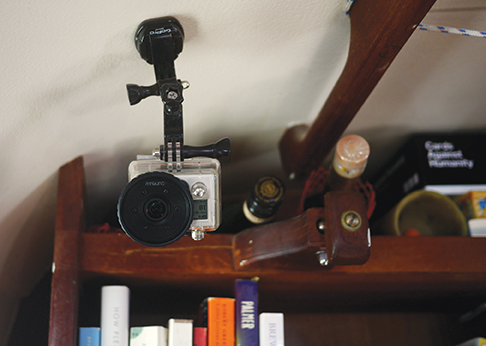 Now that you have the camera sorted out, the next step is to put it in the best place to catch those dolphins playing off the bow or that incredibly wicked cross-sea. Holding the camera in your hands for filming works, but for the good stuff you’ll want something a bit more capable. Plus, mounting your camera will allow you to be included in the video.
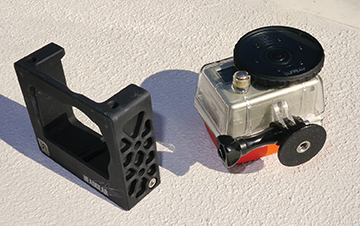
The GoPro cameras use a clever mounting system that allows you to adapt the camera to nearly any type of surface. But be aware that the adhesive-backed pads that are a core part of their attachment system can give out in the pitching, rolling and wet environment of a sailboat. Instead of trusting your camera to those sticky pads, get the tripod adapter or a full cage such as the Unruly Headgear. These use standard 1/4-20 screws that you can get at any hardware store. The rail mounts that GoPro provides are also slightly fragile and prone to losing the noncaptive nuts if you aren’t careful, or if, as the author found out, a wave ungracefully slams the unclamped mount out of your hand. When using a tripod adapter or cage, try to protect them from UV and be especially careful when mounting and demounting.
Cameras and waterproof housings will often have a tripod socket on the bottom already, which is also a 1/4-20 thread screw. So anywhere you can put a 1/4-20 bolt, you can mount the camera. As you’ll see, this will open up a world of possibilities.
One of the first places you’ll want to stick a 1/4-20 thread screw is on the end of a long pole, or, better yet, an insert that goes into your boat hook. With a little practice you’ll quickly find out how to get beautiful bow wave footage, dolphin close-ups and overhead scenes.
Other clever places to put these screws are in key vantage points on your rails or lifelines, on the bow pulpit looking aft, or on the dinghy transom. For quick mounting, you can stick a wing nut “backwards” on each of the 1/4-20 bolts, leaving about a half inch of thread showing above the nut. After threading the camera on and finding the right angle, just back the nut against the camera body to snug it up. Then the camera won’t spin as the boat or pole moves and you can easily turn it to different angles depending on what you want to capture.
HOW TO MAKE IT LOOK GOOD
So, you’ve got the camera, you’ve figured out how to mount it securely and you’re ready to hit the record button. Here’s how to start thinking about your footage in a way that will help you edit it into a cohesive and engaging story later.
One of the first rules is to think about the story you’re telling before you shoot. Try to capture those seemingly mundane moments such as freeing the mooring or weighing anchor. These introduce the story of “we’re going sailing.” Also, don’t just capture the pretty sunsets, or get up early and catch a beautiful sunrise or two. Try to anticipate some of the scenes you’ll want to feature, such as sighting land after a long passage, or the advancing squall line before the storm hits, and put a camera in place to catch the action before you need to spend time handling the sails. By thinking ahead of time what you really want to capture and by filming supporting content to introduce the subject, your video story will be much more coherent.
Another technique you’ll find very useful is to “lead” the scene. This means that before you just point the camera at the main subject of the shot, you first pan into it from something related. For instance, you might start with the bow wave of your boat and pan through the beautiful turbulent water before finally focusing on the shark that’s been swimming beside the boat the whole time. Or you may catch the glitter of the sun on the lifelines before panning to the sunset itself. After a few edits, you’ll get a feel for how quickly or slowly you need to do this transition for it to make sense. You will discover how transitions can add a polished feel to your videos rather than just showing abrupt sequences of “subject, subject, subject”, one right after the other.
However, sometimes this latter idea is precisely what you need. For action sequences in particular, cutting quickly between the related scenes adds a feeling of intensity and edginess. This part can be done afterwards, but usually, if there’s time, I always try to lead the subject in case I decide I want to use that extra footage.
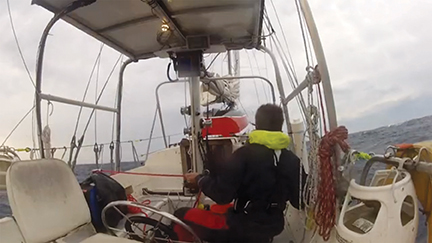
The GoPros benefit from being as close to the action as possible and you can often put them less than a foot away from the subject to get incredible results. The GoPro wide-angle lens allows the subject to fill the screen this way, making it seem larger than life. And don’t forget to wear the camera while steering, swimming and going aloft.
Last but not least, there is always what filmmakers call “B roll.” This is additional footage of all kinds, such as someone at the helm, kids reading in their bunks, the wake of the rudder, or surfing waves on a downwind romp. You’ll use this footage to help build the idea of what life aboard is like. I shoot a lot of B roll around sail and line handling, cooking, weather and scenes at anchor or in the dinghy. All of these “ordinary moments” are an important part of the story and put the significant events into a context that helps them stand out more dramatically later, so definitely don’t forget them.
 PUTTING IT ALL TOGETHER
Finally, you’re in a gorgeous remote island port after a thrilling passage and you want to put all your amazing footage into a video for the world to see. This is the point where assembling the footage from different clips—and probably from different cameras—into a single video is going to test your editing. Don’t panic. Editing is actually quite simple and with the help of today’s software it is as easy as drag-and-drop.
There are several pieces of software you can use to help make this stress-free and fun, but I’ll recommend the three easiest and most straightforward tools right here. You can spend a lifetime learning advanced skills, but these tools make putting together an engaging and enjoyable video from your various clips a cinch.
First, if you have an Apple Mac computer you’re probably already familiar with iMovie. This is going to be your tool of choice. It’s inexpensive and extremely powerful but simple to learn and creates very high quality movies. If you’re brand new to iMovie, go through the tutorials and you’ll figure everything out pretty quickly. Plus, it has some movie templates that put cinematic “intros” and “credits” in your film for you, making your video look just like a commercial movie trailer.
If you’re on a Windows machine, you’ll want to take a look at Corel VideoStudio Pro. (Windows Movie Maker seems like a good piece of software but there are too many stories of people being frustrated by its limitations.) While VideoStudio Pro isn’t as easy as iMovie, it’s not hard to learn and will let you make excellent videos after you’ve spent just a little time with it. VideoStudio Pro is not for complete neophytes though, so if you’re hopelessly lost, you might want to consider another option.
Surprisingly, one of the easiest and most fun ways to make a movie is on an iPad using Apple’s iMovie for iPad software. This is so easy your kids can do it. Its fun and straightforward approach makes for an afternoon of entertainment rather than frustration, and it’s easier to fit in the shore bag than the main laptop. I’ve made a few movies using this, and the whimsical approach and clever templates make for great memories of your trip.
Whatever you choose, though, you’re sure to have a lot of fun retelling your stories through video. And by employing these tips and techniques you’ll see just how easy it can be.
TRICKS FOR CREATIVE SHOTS
If you want to make your footage special, try some of these ideas with your camera:
– Fly it up the mast by tying the boat hook to a halyard like a pigstick with the camera on top.
– Film your boat from the dinghy while entering or departing harbor, or while dropping the anchor (get within a few yards of the bow while the anchor splashes down for a dramatic effect).
– Film the boat from underwater while diving. This works best with the sun directly overhead in clear water.
– Using the sun to your advantage, catch sparkles and reflections by shooting with the subjects backlit or sidelit by the sun, and beware of shade on your main subjects that can cause them to be black against the bright background.
– You can film with multiple cameras from different angles to “cut” between them for the same event. This gives more interest to your video and works especially well with one camera catching a wide-angle view and the other focusing on details or close-in action.
Daniel Collins, an ASA certified sailing and navigation instructor, amateur extra class radio operator and small boat racer, enjoys experimenting with marine electronics. He is also actively involved in community-driven social change. Email him at daniel@oddasea.com, or read his blog at www.oddasea.com. He owns Aletheia, an Allied Princess. To view a fun movie Daniel made while out at sea using only his iPad, visit https://vimeo.com/40523767.
(Published in the December 2013 issue of Blue Water Sailing magazine.)


