Here are some great coastal navigation tips from our friend Capt. John of skippertips.com…
Imagine sailing toward a landfall–just six miles to go now after two full days at sea. Tonight you’ll be nestled in a quiet, pristine anchorage. But first, you’ll need to squeeze through a twisting channel pockmarked with “green-tinted” shoals to port and starboard. What strategies can you use to make this navigation challenge safer and easier in all sailing weather?
Look at your chart or plotter software and note any areas tinted in shades of green. These are “inter-tidal” areas that cover and uncover based on the state of the tide.
These sand bars, marshes, mud flats, oyster beds, coral reefs, shell or rocky bottoms will often be hidden at higher stages of the tide. Sail clear of these hazards to prevent catastrophic damage to your small sailboat.Be aware that even dangers that are advertised to “uncover” can cover up at certain times because of weather or other natural phenomena.
At neap tides that occur twice each month (at the quarter-moon phases), tides will be higher than normal at low tide and lower than normal at high tide. On the other hand, spring tides that occur twice each month (at the full and new moon phases) create lower low tides and higher high tides.
Heavy rains or storm surge can alter water heights in a big way. Realize that at all times, tides and currents are “predictions”. Use other resources, like local knowledge (i.e. sailors, commercial fishermen, tug skippers or others familiar with the waters you sail or cruise) and cruising guides to fine tune these forecasts.
Navigation Tips to Meet the Challenge
Give a wide berth to any intertidal area within two miles of your sailing track line, in particular those that lie to leeward (downwind). Highlight green tinted areas.
Fix your position with more frequency. Compare your fixes to the DR course line and correlate each fix with a sounding from your depth sounder (this should be standard practice when you are “on soundings”). Has unexpected current or leeway set you off of your intended course? Take action now to keep your sailboat in safe water.
More Solutions for the Electronic Navigator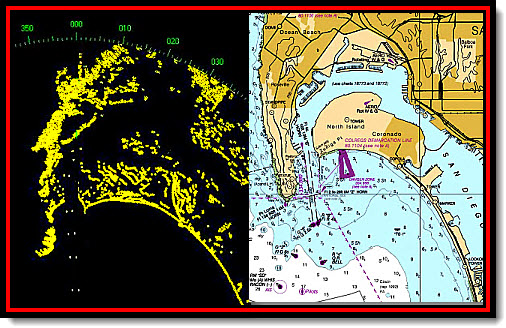
Not many electronic navigation devices beat the small vessel radar for versatility and accuracy. But use caution if the landmass nearby shows green tint along the coast or inside the solid coastal high water mark.
Radar signals will skip right over green tinted features because of their low profile and poor reflective qualities. Or, landmass might block the signal and present a ragged picture on your scope.
You can see this on the image to the right of San Diego Bay entrance. Note how we are approaching from the south. The bold curved outline to the east and northeast stands out sharp as a pin. As do the Bay entrance buoys.
But note how the radar signal has been blocked and skipped over some of the landmass to the west and north. That’s just another reason to always use radar in conjunction with a nautical chart. Glance back and forth between the radar and chart until you acquire confident orientation to the picture you see on the scope.
Take ranges and bearings to those points that show the boldest landmass (no green tint nearby would be ideal, but not always possible). What if your radar scope presents a spotty picture that proves difficult to interpret? Use the five quick ‘n easy steps below to acquire good orientation between your radar scope and nautical chart.
- Fix your position by the most accurate means available (GPS, visual, soundings combined with a DR or EP).
- Plot a bearing with your protractor (or similar device) from the position you just plotted to each land point (or aid to navigation) that you intend to use. Write down the bearings (magnetic).
- Measure the distance in nautical miles and tenths to those same points from the position you just plotted. Write down these ranges.
- Use the radar EBL (Electronic Bearing Line) and VRM (Variable Range Marker) to verify those same bearings and ranges to each desired landmass point or aid to navigation (i.e. sea buoy, major light structure). The EBL enables you to move an electronic “cursor” to obtain a bearing. The VRM enables you to move a similar electronic marker onto an object to obtain a range (“range” in radar means distance).
- Set the EBL and VRM onto the land mass points or aids to navigation that you just plotted. Do they match? If they do not, stop or heave-to and figure out why. Pick alternate points and go through the same sequence described in steps 1. through 4.
Continue this process until you have good orientation and agreement (correlation) between the radar picture and the picture on your nautical chart. Then, you may proceed with confidence and take radar ranges and bearings to these points to back up your GPS along any coastline, enter a fog shrouded cove for anchorage, or pick your way from buoy to buoy to safe harbor in any weather–day or night.
~~~~~~~~~~~~~~~~~~~~
Follow these easy sailing navigation tips for safer sailing. Keep your small sailboat in safe water and your crew safe and sound throughout the sailing season–wherever you choose to sail or cruise!


