Boats of a certain age will almost always be in need of a refit. here’s how we are refitting our 15-year old 45 foot sloop (published October 2013)
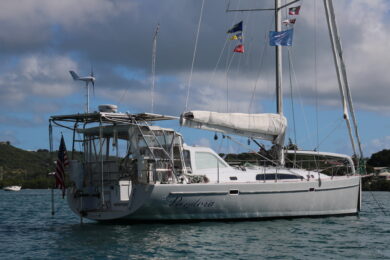
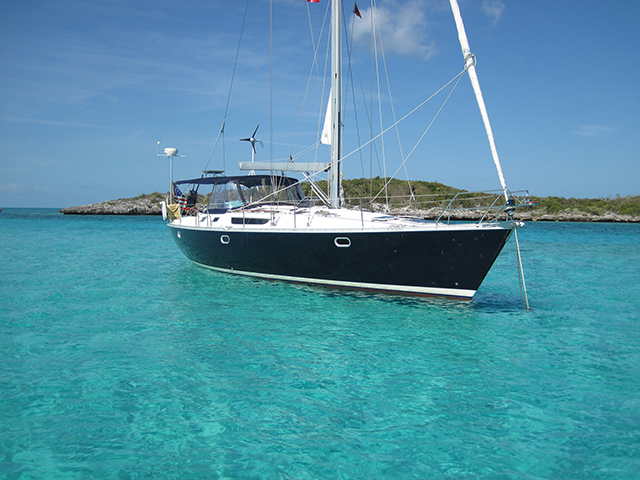
Rosie and I, with our partners Tony and Judy Knowles, bought our Jeanneau 45.2 in the fall off 2010 with the intention of having a good-sized, modern cruising boat that would sail well and would be able to accommodate each of our respective families in a fair degree of comfort. We often joke that Lime’n, as we named her, is a three bed, two and half bath cruising condo that will do eight knots up wind in a good breeze and more when reaching. We are happy to report that two winters ago we sailed her to the Bahamas and back from her home waters in Newport R.I. and made the 1500 mile passage from West End to Newport in seven sailing days.
Lime’n is a good boat that suits our needs and will be in the Caribbean this coming winter. So we have put a few miles on her since we bought her and have plans to put on a lot more. That being the case, we have spent the last two years in an ongoing refit to make her safer, more comfortable and more fun to sail. I should note, also, that Tony Knowles is a highly regarded marine surveyor, so he knows the pointy end of sailboats from the square end better than most; and, being the handier of the two of us, Tony has done a lot of the upgrades on the boat. Here’s how the 15 year refit has played out so far.
UNDER THE WATER
 Jeanneaus have iron keels. Ours is a shoal draft fin with a large bulb on the bottom. When we took ownership, the keel showed signs of neglect and had many, many rust blisters, pits and general oxidation. This needed to be fixed so we set about with a solution that was time consuming but promising. First, all of the rust spots were ground down to bare metal. To this we applied a cleaning and sealing coat of Ospho rust inhibitor that killed any oxidation that might have remained. On top of this we applied a skim coat of Interlux’s Watertight Epoxy Filler that sealed the rust free metal permanently. Then, we applied over the whole keel, old paint and all, nine coats of Interlux 2000 epoxy barrier coats. Lastly, we applied several coats of Micron 66 and crossed our fingers. A year and a half later when we hauled the boat out back in Newport, the antifouling was on its last legs but the keel treatment had worked well. We had to repair only a few small rust spots.
MAST, RIG & SAILS
 The boat came with a Sparcraft Rig with an in-mast furling mainsail and a genoa on a Profurl roller furling system. The odd thing about the rig was that the mast was raked slightly forward and didn’t look right. The sails that came with the boat were original and needed to be replaced.
After giving the rig a thorough inspection, we sailed with it as is for a year and half and put some 6,000 miles on it without changing anything but the sails. We replaced the sails with Mack sails; they built for us a neutral roach mainsail with vertical battens and a miter-cut genoa that was built with quite a full shape and fairly high on the foot for good visibility forward. These sails have served us well and helped us reel off a lot of fast and fun passages.
In preparation for the trip to the Caribbean, we pulled the rig and gave it a magnifying glass inspection and luckily did not find any cracks in swages, barber-poling in the wire or defects in the tangs, ends or spreaders. The crane for the spinnaker halyards at the mast head was bent over so we replaced that with a well engineered, massive stainless steel part that will be around until the next millennium. We did not have a masthead tricolor so we exchanged the incandescent anchor light with a new LED tri-color and anchor light from MiSea. And because we like to fly burgees from the top of the mast, we had a stainless steel pig stick or flag pole built that will keep the flags above the working parts of the wind instruments. Importantly, we consulted a good local rigger about the mast rake and he suggested we add a large toggle to the top of the headstay to lengthen it and thus shift the mast aft. Such a simple fix has made all the difference and the mast is now straight and set up with a slight pre-bend.
We were happy with our new sails but the mainsail had a slight sag at the top of the leech and the whole leech needed stiffening up. So, our guys at Mack Sails took the sail and added a fourth vertical batten near the sail’s head and upgraded the battens to stiffer stock. The fix is perfect and the in-mast sail is as functional and weatherly as any in-mast main I have used.
Tony and I had always wanted to try a modern laminated headsail so we went to Quantum Sails to get them to build us a new Fusion M genoa that uses the latest laminating technology and provides many of the sailing characteristics of modern racing sails. This is an upgrade that will appeal to sailors who have raced and expect a lot of performance out of their cruising boats. That’s us. We are very happy with the shape and power of the new sail.
We use the rigid boom vang to hold up the boom instead of a topping lift and to trim the mainsail’s leech when under sail. The Sparcraft vang on the boat had gas cylinders to maintain upward pressure but unfortunately these had to be replaced more regularly than we liked so we needed to make a change. The solution presented itself when a buddy mentioned that he had a Forespar Yacht Rod mechanical vang he wasn’t using that would fit our boat. So, we now have a powerful and reliable vang and don’t have to worry about the boom bonking anyone on the head.
ENGINE & SYSTEMS
 Lime’n came with a 100-horsepower Yanmar diesel that had about 2,000 hours on it. That’s young for a 13-year old marine diesel. And, it was in excellent condition. There was really nothing serious we needed to do to the engine other than to change the transmission fluid, which looked original and awful.
But we did want to improve the boat’s sailing qualities so we decided to change the three bladed fixed prop for a folding or feathering prop. We settled on a three bladed Gori propeller from Demark largely because I had used them a lot and have found them to be beautifully made, reliable and efficient. That’s not to say the other well known brands would not have served us just as well, but we decided to go with what we know.
As we got to know the boat the first summer, we discovered that the transmission was not functioning well and probably had some fused plates that made shifting difficult. We lived with it right through the trip to the Bahamas and back, but decided that with a trip to the Caribbean looming we’d better deal with it. So, we shipped it off to the East Coast Yanmar distributor, Mack Boring, who rebuilt it for us. We changed out the gear shifter and cables for new ones and the rebuilt transmission works like new. In the process, we discovered that the engine was slightly out of alignment, so we tended to that problem as well.
 PLUMBING
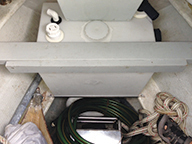
Boats of a certain age start to develop a mixture of legacy odors that can either be salty and charming or sewage-tainted and less than charming. Often it is both. Lime’n definitely had the scent of the holding tanks lurking throughout and this, we all agreed, had to go. The original stainless steel holding tanks, which had pin-hole leaks along the welds, were fitted neatly under the forward double berth and the port after double. To get these out, we had to disassemble the furniture in the cabins, which was neatly stick-built and easy to unscrew and take apart. The after tank came out easily but the forward tank had to be cut in half with a cutting wheel for removal. This was a less than pleasant job with sparks flying all over the forward cabin and stinking black ooze pouring everywhere.
The solution was to ban the new holding tanks from the living areas and change the hoses. Also, the boat did not have thru-hulls for direct discharge so the only way to empty the tanks was at a pump-out station. This is fine while coastal cruising but can be impossible when making ocean passages. So, in addition to changing out the tanks, we needed to plumb new thru-hulls as well.
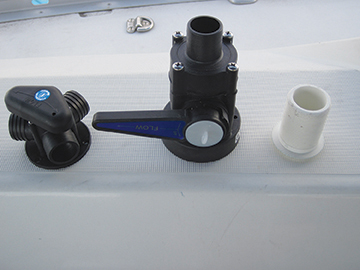 We sourced polyethene tanks from Trionic in Wisconsin that do not sweat or emit odors, and went with Delrin ball valve seacocks and thru-hulls made by Forespar. All of these parts are inert and should last forever. I hate drilling new holes below the waterline, but when we did we were impressed with how hard it was to get the drill bit and hole bit through the layer of Kevlar cloth that is in this boat’s fiberglass hull lamination.
The new aft tank fit neatly into the port sail locker tucked away under the side deck and was fixed in place with corner chalks. The Y-valve is accessible in the locker and the seacock is easily accessible through the lazarette. The forward tank fits neatly at the forward end of the sail locker in the forepeak and plumbs easily to the new seacock at the bottom of the locker and to the pump-out deck fitting on the foredeck. We knew this was going to be a big job when we started out and it turned out to be just that, though it was worth it.
In general, head odors emit from the hoses more than from the tanks. The standard white head hoses with a smooth bore work fine but will begin to smell if waste remains in them for any length of time. You can upgrade to totally impervious hoses at a price. We only used the expensive hose for the length that runs from the forward head through the master cabin and to the holding tank in the forward sail locker, a hose that in the past had been a particular offender.
The after head’s raw water intake was positioned about a foot below the waterline so when the boat is heeled over on the port tack it wouldn’t flush. Instead of drilling another hole in the boat for a seacock more on the centerline, we were able to T-off a seacock not far from the head that was installed when the boat had been upgraded with air conditioning by the first owner. The head now flushes even when heeled hard over.
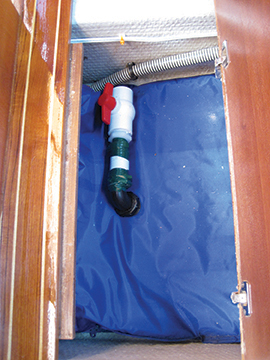 The fresh water tank holds about 100 gallons and that is certainly sufficient for coastal cruising. But, when we decided to head to the Bahamas, and the Exumas in particular where fresh water is a valuable commodity, we opted to add a flexible bladder tank beneath the floors amidships. This plumbs neatly into the fresh water manifold which was originally set up for two built-in tanks.
ELELCTRONICS
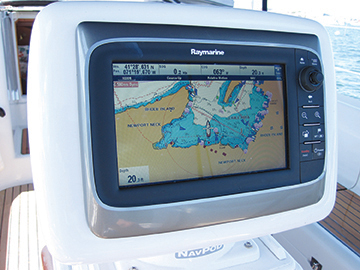 Lime’n was equipped with Raymarine electronics that included a C 80 multifunction display, analog radar, below-decks autopilot and four instrument displays for wind, boat speed depth and other sailing data. We used Navionics Gold charts in the chartplotter. The electronics worked well enough and we all had grown comfortable with the human-machine interface. We still keep a log and use paper charts, but the electronics are a great aid.
But in the Bahamas, and then when we were leaving for home, Lime’n was struck lightly a couple of times by lightning and our electronics became unreliable and often did not work properly at all. So, we had the system checked out by Cay Electronics in Rhode Island who in turn condemned the whole system. Our insurance company stepped up and agreed to replace our electronics with the equivalent of what we had, only new.
A lot has changed in marine electronics since 1998. The chartplotter of old is now a multifunction display that can run everything on split or multiple screens. With SeaTalk, information is shared and crunched amazingly quickly. Plus, the world of touch screens has been introduced to sailors. Since we were going with a new system, we had to decide how to configure it to meet our needs beyond the straightforward replacement.
The basic new system specs provided for a e 95 multifunction display in the cockpit mounted in a NavPod, four I 70 displays (two at each helm), a new autopilot, wind instruments, depth sounder and digital radar. To this we added a second multifunction display to be mounted at the chart table below and went with the brand new e 97 Hybrid Touch with it’s cool touch screen. We opted to add AIS because of the amount of time we spend along busy coastlines; we consider AIS to be one of the best safety innovations to come along since the EPIRB. And we added the new sonar fish finder function that allows us to find fish, naturally, but also look at the bottom below to gauge how good the holding will be for the anchor and to identify any obstructions or contours that might not be on our charts.
So, we seem to have it all and we are gradually getting to know the system and it’s human interface, which is similar, but quite different from our old system.
We had a good VHF radio that survived the lightning strikes, but we did have to replace the antenna so we took the opportunity to add a second VFH in the cockpit. The new ICOM VFH with DSC was mounted at the chart table and uses the new antenna at the top of the mast; its range is more than 20 miles. The old VFH got moved to the cockpit and we mounted the antenna on the electronics pole on the starboard quarter with the AIS transceiver. The Edson pole that we mounted a couple of years ago is home to the radar, GPS, AIS and VFH antennas. If we were to lose the rig over the side, chances are good that we would still have all of these useful tools to help us get home.
 ENERGY SYSTEMS
Lime’n is almost never plugged in to shore power so we have to rely upon her onboard systems to keep the battery bank topped up. We have three group 31 batteries in the house bank that provide about 300 amp hours of capacity and another group 31 for the engine starting battery. These are charged off the engine with an 80-amp alternator that actually puts out about 40 amps once it is hot and working hard. With this set up alone, we need to run the engine for about two hours daily to keep the batteries fully charged.
But that’s not a good cruising solution, since you often want to lie at anchor in some lovely spot for a few days and don’t want to run the engine just to keep the beer cold. Besides, running a marine diesel at low revs and under a low load is a sure fire way to coke up the cylinders and ruin the rings.
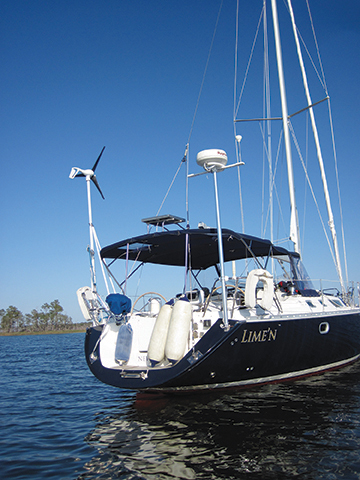
The solution was to add alternate energy sources. We were lucky enough to have a neighbor who had bought an Airbreeze wind generator that he wasn’t using so we acquired that for Lime’n. With a pole and brackets from Southwest Windpower, manufacturers of the Airbreeze, we mounted the generator on the boat’s port quarter. The wiring runs into the port cockpit locker where we installed the unit’s voltage regulator and switch. The charging current runs through a standard battery switch so we can isolate the unit from other charging sources.
The wind generator kicks off about 8 amps per hour when the wind is blowing at above 10 knots and will gradually increase output to 20 amps as the wind increases. When the wind falls below 8 knots, the unit’s efficiency drops off rapidly. As a rule we can count on it supplying about 60 to 80 amp hours to the battery bank daily.
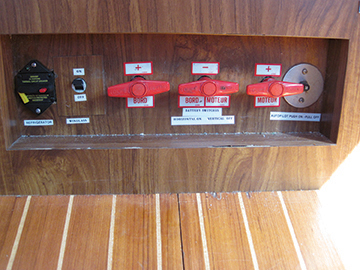 But the wind doesn’t always cooperate, so the next part of the solution was to add a solar panel. The old radar was mounted on a bracket on top of the Bimini which became the perfect place to mount a 75 watt panel. The solar panel charging wire also runs through the battery switch used by the wind generator so we can use one or the other, both or none. On a sunny summer day, the panel puts out about four amps for eight hours or 32 amp hours, which is enough to keep the fridge cold and the batteries topped up.
Working together, the wind generator and the solar panel make Lime’n self sufficient for long periods, which is very useful at sea or when cruising in remote island groups or developing countries.
LIVING ABOARD
Since we spend a lot of time aboard and want Lime’n to be our floating home, we made a few upgrades to the interior that have really made a difference.
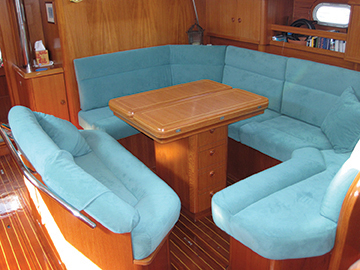 The boat has a large dinette that will seat eight for dinner. While we live in the cockpit all day, we tend to live in the dinette during the evening. The boat came with tired blue velour seat covers with equally tired cushions inside them. So, we splurged and went with all new cushions that we covered with Ultrasuade. The dinette looks much better and the Ultrasuade is easy to keep clean and bright looking.
For the bunks, we went with all cotton sheets and pillow cases. A friend is gifted with needles and threads and offered to create form fitted sheets for us, which have turned out beautifully and are amazingly comfortable.
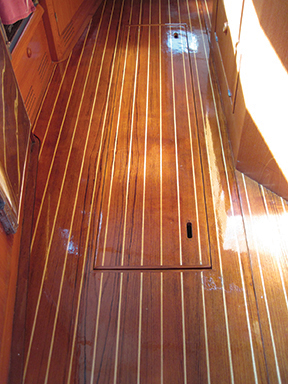 The cabin soles, which are teak and holly veneers over marine plywood, had faded badly so last winter Tony striped them to bare wood and then refinished them with Epiphanes varnish which was then covered with a hard polyurethane finish. They look great.
THE TO DO LIST
We have done a lot of refitting to Lime’n over the last two and half years and we certainly aren’t done. You never are. You stop when you run out of time and money and then start up again when these two items are in better supply. There are several big projects we are looking at, such as painting the hull that will have to wait. And there is a list as long as your arm of little things that we will get done along the way. But, that is a big part of the fun and engagement of owning and using a good cruising boat. There is always something new to do, and something interesting to learn about the boat itself, the rig and sails, and all it’s systems. It’s a journey that can last a lifetime.
