How to use this popular GPS game to become a better navigator (published November 2013)
The hobby of geocaching has been popular for many years now. In its simplest form, you hide a small container with a logbook in it, and then post the GPS coordinates of the cache where interested parties can see them. Then they go find it using their handheld GPSs along with whatever hints or riddles you provide, sign their name in the logbook, put the cache back where they found it, and then post that they have found it. There are many nuances and variations to the process; it is a much more dynamic and engaging activity than this simple description might imply.
It turns out that the world headquarters for this activity (www.geocaching.com) is just a couple miles from Starpath’s headquarters. Their office overlooks Lake Union in the Fremont area of Seattle. This is a very successful business with over six million geocachers worldwide, many of whom pay $30 per year for special access and features on their website. And many must want their excellent $10 app to facilitate the searching for and recording of more than two million active caches. The reason the business is so successful is that the participants get their money’s worth and more. Even those who just do it for a while and quit do not mind the fees. They have had fun and they learned something. Most members are devoted to the hobby and get much enjoyment from it. For many it is a key part of their social life.
It is also a fine example of American entrepreneurship in that it was started from scratch by a couple of young friends with an idea, along with the skill and determination to organize, promote and manage the operation so it could achieve the outstanding success it has. Now, with such good resources, they have topnotch software and services and they have established a set of rules that can preserve their image of the process in light of many challenges.
GPS EXPLAINED
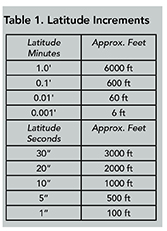
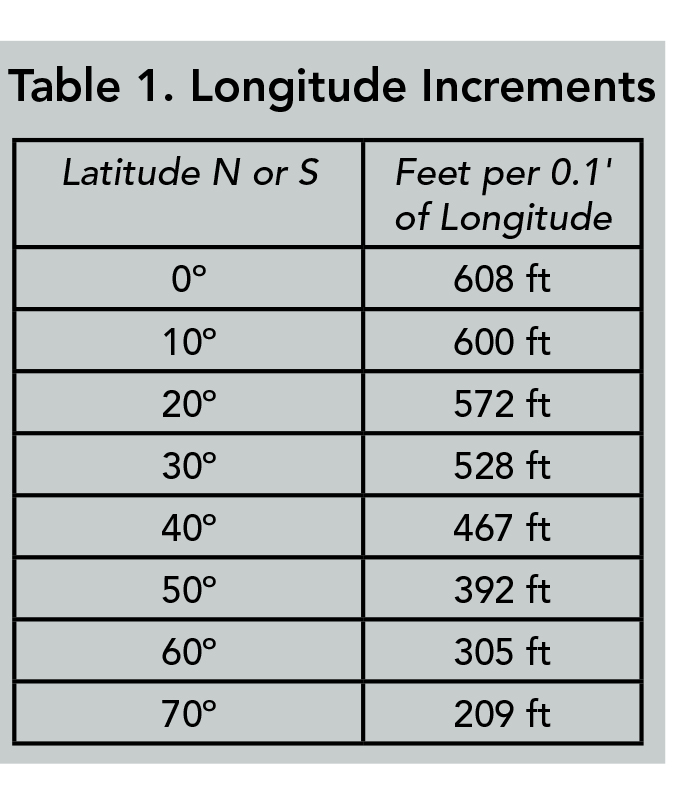 In the age of GPS, geocaching seems a natural pastime. You cannot do it without learning how to optimize your GPS work. We often get to remind even seasoned navigators about the conversions shown in Tables 1 and 2. You won’t get far in caching without knowing that 0.001’ of Latitude is about 6 feet, and likewise that this is not true for Longitude––that is, assuming you do not have an app that does all the computations for you, which is bound to hamper the will to learn the basics.
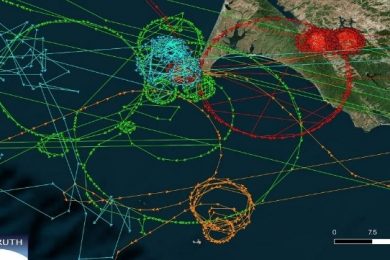
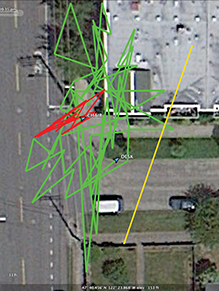
Furthermore, a commonly reported GPS uncertainty is 16.4 feet (5 meters), which also teaches us something: the uncertainty is not necessarily the error. More often than not, you can home in on a target well within the reported uncertainty. GPS positions will scatter about the indicated position with some standard deviation. A good way to study this is to simply park your GPS linked to an e-chart tracking program and let it sit overnight. You will get something like what is shown in Fig. 1. Modern handheld units include an option to average the position, even reporting back to you when they have a good fix. It typically takes just a few minutes. But then do the exercise at home with the GPS facing a window with limited view of the sky. The pattern will be different, and larger, and take longer to home in.
In some circumstances, however, the center of the distribution is not the true location, although the true position is usually within range of the displayed accuracy if it is stable long enough. I will come back to such nuances of precise navigation with consumer-grade GPS units in a later article.
When tracking down caches you also very quickly learn the limitations of the compass apps in mobile devices. These are still very sensitive to horizontal alignment as there are fixed coils in them that measure the strength of the magnetic field components, and this field is not parallel to the surface because of the dip angle. But with practice we can learn how to use them. Most mobile-device compasses have self-correcting procedures to adjust for local disturbances, but this does not address the alignment issue.
True versus magnetic is not an issue, because they are sitting right next to a GPS. They know where they are so they can compute the magnetic variation very accurately. They all use a program called Geomag, which you can download and put into your own computer if you like, which is a nice back-up if you get stuck with old charts at high latitudes (www.ngdc.noaa.gov/geomag).
GEOCACHING FOR MARINERS

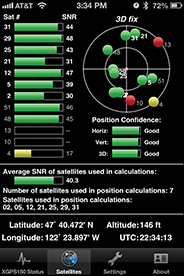 From what I have learned of geocaching, it seems to me this is an ideal way to practice marine piloting. First to fine-tune the use of GPS, which might include learning more about what satellites you are using, and when to expect better fixes when the present ones are not so good—66 feet of uncertainty vs. 16 feet, for example. Are you next to a bluff in your boat, or between skyscrapers downtown? It will show the value of having a display of the satellites in view and how to interpret it (figure 2), and how to anticipate when this will change. If you are in a real bind, i.e. traversing a narrow fjord with just a sliver of sky, there are handy free apps that predict satellite passes for your location, with the altitude and bearing of each as they pass. These apps are also useful for predicting the next Metop-A pass for satellite wind data. Check your AppStore for a slick free one called Satellite Tracker by MacCon.
You can also get practice sending yourself gpx files. This format is the best way to transmit waypoints, routes and tracks from one device to another, or to Google Earth. There is a neat utility online to help with this at www.gpsvisualizer.com (discussed in the December 2012 issue of BWS).
The main geocaching goal for mariners, however, would be to go on and practice the more sophisticated piloting skills we teach in the classroom. These days, it is only the conscientious navigator––we would say prudent––who takes the time to learn the old methods of navigation, so they are not dependent on the GPS, but there is plenty of evidence that this is worthwhile.
Beyond the basics like crossed compass bearings and the use of natural ranges, we can really home in on our position using a simple plastic sextant that costs less than $50. Few navigators and geocachers realize that you can pinpoint a position on a chart much more accurately with a sextant—essentially the same as used in the 1700s—as you can with the latest handheld GPS. There is a detailed explanation of the methods in the book How to Use Plastic Sextants––With Applications to Metal Sextants and A Review of Sextant Piloting. Your accurate position is determined by the two horizontal angles A-B and B-C between three objects (A, B, and C) on the near horizon. These two angles are essentially the differences in the bearings to the objects, but the sextant angles will be far more accurate than bearing differences. Once you have these measurements, you need a large-scale chart that shows the three objects on it, and then there are several ways to solve for your position.
The simplest is to use a three-arm protractor, which is designed to solve this problem. Inexpensive plastic ones are available. Set the two angles on the protractor and move it around the chart until the three index lines cross your three targets, and you are located at the hub of the arms. Alternatively, you can draw the two adjacent angles emanating from a single point on a piece of clear plastic (overhead projector sheets, if you remember such things). Then slide that plastic around on the chart until the three lines defining the two angles each cross one of your targets. The Plastic Sextants book also describes plotting procedures that can be used without the need for three-arm protractors or transparencies, which can enhance the accuracy.
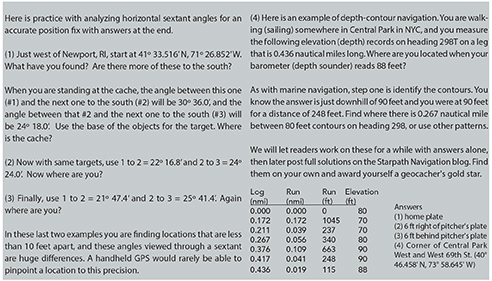 Another advanced skill of marine navigation that you can practice on land is depth-contour navigation. In the fog with no GPS, you sail on a steady heading and record the depth at several log readings. Then on your chart highlight a few of the depth contours in your approximate region. Then plot a line on a piece of transparency and using the same distance scale as your chart, mark off the logged runs between measured contour depths, corrected for tide and draft. Then slide that sheet over the chart keeping the line oriented in the heading you were sailing until you find the place where you cross the contours at the right rate. In many cases you can get by with a roller plotter and dividers, without the transparency. If the bottom is not flat, nor water too deep, this will often locate your position.
To practice on land you can use elevation contours, replacing the depth sounder with a good digital barometer. You do need an actual barometer, however, because GPS elevations reported are not accurate enough for this. Some GPS units and some smart phones have barometers in them, which should do the job. You must always normalize the pressure reading at some known elevation to account for the atmospheric pressure.
Both of these exercises can be practiced online, without getting up from the desk. Google Earth shows precise locations as well as digital elevations, but no contours. You can also drop a pin at locations of interest so they will show up when you print the screen to make your chart.
For the depth-contour exercises, it is best to use the USGS National Topo Viewer (viewer.nationalmap.gov/viewer), again zooming in on what you need and plotting out a chart. Check out all the tool options for measuring distances, spot elevations, and so on. It will help ID the contours and distances between them. Google Maps has a terrain view that shows some contours, but nowhere near as good as the USGS Viewer.
