Enjoying freshly baked bread on board does not have to be a luxury, nor does it require a trip ashore. In fact baking bread on board doesn’t even require an oven (published August 2016)
I recently had the opportunity to share my passion for bread making with some ladies in the Solomon Islands. Bread was not a staple of their island diet, in fact flour was so infrequently used that it was not sold at the little village store. So, I brought all the ingredients we needed to make basic white bread; flour, yeast, sugar and salt. Clean water was available onshore. We had a collection of bowls and spoons of various sizes, a few flat baking pans and a couple of small cake tins. We spent a morning getting to know one another as we mixed and kneaded the dough, shaped loaves and buns, and waited for the bread to rise.
When it was time to bake the bread I was lead to a thatched leaf haus where I was told the oven was ready. As I stepped inside I saw an old 44 gallon drum, half filled with river rocks and the glowing hot embers of burnt coconut husks. The ‘oven’ was hot. We put the first two loaves inside, covered the drum with a piece of corrugated iron and heaped more coals on top. About 20 minutes later the bread was baked to perfection; the tops the color of varnished teak and the bottom sounded hollow when tapped. There were murmurs of pleasure as the smell of freshly baked bread filled the air.
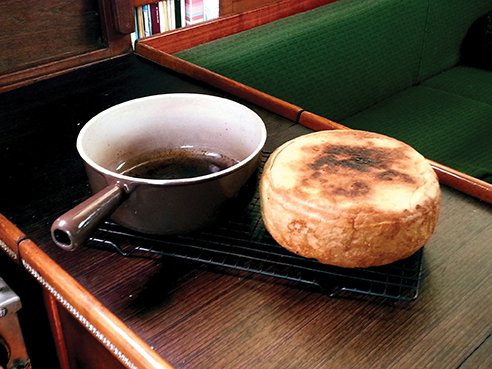
The experience reminded me how simple bread making really is. Fancy ingredients, bread pan and ceramic baking stones are definitely not necessary. In fact neither is an oven, however rudimentary it might be. For years onboard Kate I have been ‘baking’ bread on the stove top. Using nothing more than a heavy bottom pan I have turned out loaf after loaf of bread with a lovely golden crust and a soft, light crumb; just like traditional oven-baked loaves. Proving that the indulgent taste of fresh baked bread need not be a luxury, even onboard the most modest sailboat.
EQUIPMENT
Stove top baking uses the same principals as oven baking; even, dry heat that is far enough away from the pan that it will not burn the bread. To achieve this, you need a low flame and a heavy bottomed pot with a lid.
My two favourite pots for baking bread are cast iron Dutch ovens, one enameled and one not. Many people think cast iron pots are too heavy to have on a boat but I think they are worth their weight in gold. Cast iron distributes heat more evenly than other types of pots so they are less prone to hotspots, and they hold heat for longer which means they keep cooking after the burner is turned off. They are also great for baking bread over a campfire, which we like to do. Most people have stainless steel pots and pans onboard and this is a good choice as well, the heavier the bottom the better. A two to three quart pot, with an eight to nine inch diameter, is the perfect size for a large loaf of bread. Alternately you can bake bread in a heavy frying pan; your loaf will be thinner but just as tasty.
Although you do need a lid it does not have to be tight fitting as you want moisture to escape so that the bread will bake, not steam. If you have a heavy pot or a frying pan without a lid you can use a piece of well-oiled foil instead. Any type of bread can be baked on the stove top but if you are new to bread making I recommend starting with an easy and forgiving recipe; standard white bread.
INGREDIENTS
Considering how few ingredients are in bread (flour, water, sugar, yeast and salt) it is amazing how many different techniques there are for making it. I have experimented with several but my regular routine for making bread onboard is to use the sponge method. Following this method a sponge is made by mixing all the water, sugar and yeast together and then adding enough flour to make a thick slurry. This mixture is then rested until it doubles or triples in size, is full of air and looks like a sponge. I particularly like using this method in the tropics as it gives a clear indication that the yeast you’re using is alive.

Yeast, the rising agent in bread, is a living organism that is activated by heat and moisture. It likes to be warm but not hot, and if stored improperly, say on a shelf in a hot store or near a heater, the yeast can die. You cannot tell by looking at it if your yeast has expired as dead yeast does not look any different than live yeast. The only way to determine if your yeast is good is to give it the things it needs to thrive; moisture, warmth and food. When yeast is added to warm water and is given sugar and flour it becomes active and begins to feed on the starch and sugar. As it eats it gives off CO2 gas that we see as bubbles in the sponge.

After your yeast has activated, the remaining flour and salt are mixed and kneaded into the sponge until a smooth elastic dough is formed. Kneading is important as it helps to develop the gluten.

Gluten, a protein in wheat flour, changes during the breadmaking process from short particles into long interlocking strands. This change occurs with the addition of moisture and by mixing and kneading the dough. It is these strands that create a web that capture the CO2 gas that the yeast continues to emit, making the bread light and airy. It is possible to over knead dough and the result will be dense, heavy bread that will not rise completely. So be gentle but firm.

When the dough is finished place it in your heavy pan, making sure both the surface of the dough and the pan are well-oiled. I find it handy to line the bottom of the pan with a layer or two of baking paper, or a silicon baking liner. This thin layer prevents the bread from sticking to the pan and helps thwart burning. I cover the pan with the lid and leave it on the stove to rise so that there is no risk of it being disturbed when moving it, which may cause it to fall. If you are using a frying pan tent the pan loosely with a piece of foil so that the dough it not restricted. When the dough has doubled in size it is ready to bake.

METHOD
Light the burner and turn the flame down very low. Bake for 15 to 25 minutes with the cover on but slightly ajar so that any steam can escape. Many standard gas ring burners often create a hot zone in the center. For even browning move the pan every five minutes, or use a flame tamer or a diffuser.
Carefully remove the lid and check for doneness, this may cause the dough to fall slightly but it will usually rise again and regain shape. The dough has completed cooking on the first side when it appears dull and firm and is no longer sticky when touched lightly. Baking times may vary depending on the size of your burner.
Flipping the loaf is a bit tricky but the liner will help immensely to prevent the bread from sticking to the bottom of the pan. Run a knife around the edge of the pan to loosen around the edges, then using a spatula or a knife pry the bread from the pan and gently flip it 180 degrees, nestling the pale top down into the hot pan. Bake uncovered for another five to seven minutes, or until the bread is well browned. Remove from heat and take off paper/baking liner, let cool five minutes in pan. Remove from pan and cool on a baking rack. To test for doneness firmly tap the bottom of the loaf, if cooked through it will sound hollow.
BON APPETIT
Stove top baking uses only one burner on a very low flame, proving that anyone with a simple stove and a good pot can enjoy fresh baked bread onboard. Not only does this method cut down on fuel burned it also prevents excess oven heat from leaking into the cabin; pluses on any boat. If you have never made bread I hope this new baking method inspires you to try. It is easy, fun and deliciously satisfying!
Heather Francis is originally from Nova Scotia, Canada. For over a decade she has traveled the world living and working on boats. She has cooked professionally on land and on yachts and these days you’ll find her in the galley of Kate, a Newport 41’, that she and her Aussie partner Steve have been sailing since 2008. To follow their adventures log onto www.yachtkate.com.
Stove-top Bread Baking Tips
If your sponge doesn’t rise because your yeast is dead simply add some fresh yeast to the sponge and wait to see if it will rise. It might make the bread a little yeasty tasting but nothing more. Rising times can be shorter in warm climates and longer in cold climates. Judge rising by the size of the dough not by the clock. Many people are gluten-free these days but that doesn’t mean you have to forego the enjoyment of bread making. Gluten-free flour and bread mixes are available at many grocery stores. Quick breads and even cakes can be baked on the stove top using this same method. The additional sugar will cause the loaf to brown more quickly so pay careful attention and be sure to move the pan frequently to prevent burning.

Basic Bread Recipe
1 ½ Cups warm water
2 Tablespoons sugar (Honey, maple syrup or other natural sweeteners work great too)
1 teaspoon Active Dry Yeast
1 ½ Cups unbleached white flour
3-4 Cups unbleached white flour (Can substitute up to 50 percent Whole Wheat Flour)
1 teaspoon salt
N.B. Because I use a sponge method I only use one rising for this recipe but you can use two if desired. The amount of flour incorporated after the sponge will change as flour is effected by humidity.
Place very warm, not hot, water in a large bowl- you should just be able to hold your finger in it for a comfortable count of ten. Mix in sugar/honey and yeast, let stand one to two minutes. Add 1 1/2 cups of flour and mix until a uniform loose batter has formed. This is called the sponge. Cover and let sponge stand 30 to 45 minutes or until it has doubled size and lots of bubbles have formed.
Add the salt and additional flour ½ cup at a time, mixing well to combine. When dough becomes too stiff to work in bowl tip onto a floured board and knead. Continue to add flour until dough no longer sticks to the board or your hands and a smooth, elastic dough has formed. Knead for an additional five to 10 minutes.
Lightly oil the dough and put it in an oiled pan. Push the dough down so it covers the bottom evenly. Cover and let rise until doubled.
Bake using stove top method described above.


