How to use your electronic charting system for navigation, even if your GPS fails (published March 2014)
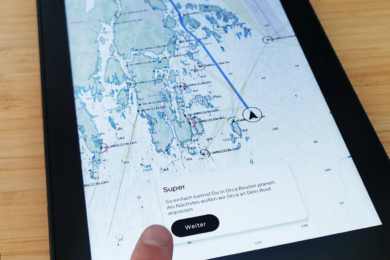
We might assume an electronic charting system (ECS) is only useful if we have a GPS connected to it so we can track our boat across the chart. But the GPS is just a luxury. We can do a tremendous amount of sophisticated navigation, both easily and accurately, without the GPS.
In fact, the crucial part of a well-navigated voyage is done before the boat leaves the dock. We can do a rough layout of the route for quick time and distance estimates, and then zoom in along the route and fine tune each of the waypoints to optimize their use underway. This usually calls for choosing them such that they correlate with good visual or radar targets along the route. Then give each a name, not just a number.
These programs also have built-in tide and current predictions, so we can estimate SMG (speed made good) along the route, and then print out a route plan with individual route-leg courses and distances and ETAs all tabulated. This is prudent preparation, with or without GPS to track us across the chart.
All U.S. echarts are free, so now there is no reason not to have all possible charts of interest at hand for any route. (I might add that the full-chart pdf versions new this year are quite remarkable. They can be viewed in a tablet or computer without any special ECS software. Check out starpath.com/getcharts for a portal to the echart options.)
In this note we look at a couple ways you can navigate with echarts without relying on GPS—or put another way, if you happen to lose your GPS, don’t shut off the ECS. It remains your most convenient and accurate means of chart navigation.
Consider the challenge of getting from A to C, without hitting B, an unmarked underwater hazard, in the dark, in strong current. Consider a hypothetical example, where we must enter a channel about three miles to the west at night, when we have read in the Local Notice to Mariners that the buoy “FR” marking the reef is off station and not showing its light.
We look at a couple ways to monitor progress without GPS to be sure we do not get set down upon the reef. Tidal current predictions are for 1.5 knots setting toward 135 T at the time along this route. We can learn the currents directly from the ECS program underway, without wireless connection.
These are belt and suspender conditions. We start from a known position having just passed a small islet. We can power at 6 knots, but we know we will be set by the current and need to correct for this. To track due west, we will need to point into the current.
Correct for Current
We can use GPS to figure the course to steer as shown in Figure 1. So as our knotmeter reads 6 knots and our heading is 280 T, we can assume we are making good 270 T at a speed of 4.9 knots. This helps us keep track of our position by dead reckoning as we proceed, but we need ways to check this.
Use Danger Bearing
Next we can quickly measure from the echart an accurate danger bearing to the QG (Quick flashing Green) light that will keep us off the reef. We see that this bearing should not exceed 264 T.
In this hypothetical situation, the only thing we have left to use is our sounder. This is not an ideal route for depth sounding navigation, but even in this case there are still a few guidelines that can assist our navigation. The main point for now is to show how powerful the ECS is for setting up sounder navigation.
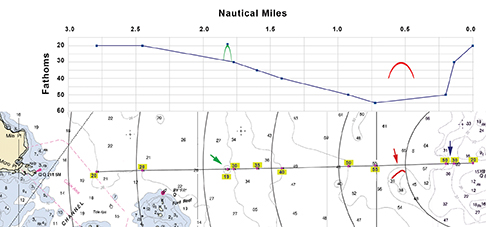
This is just a sample of the information we might obtain by this type of analysis, which is very quickly implemented with an ECS program. We used Coastal Explorer from Rose Point, which is well suited to chart navigation with ECS, as are other leading programs as well.
Line of Soundings
Whenever the water is not too deep (i.e. our sounder works) and not too flat, we can usually gain much nav info from a line of soundings. Figure 2 shows an example of this fast and accurate way to set this up using ECS. Depths must be corrected for tide height, also available with a button click in ECS.
(1) Set up the route line for the leg to be navigated.
(2) Then zoom in and follow it along, inserting a waypoint at each depth contour or notable sounding. Name the waypoint with the depth.
(3) Then use your ECS function that itemizes the route. It has various names: Route Details, Plan Book, Voyage Plan, etc. It is a list of waypoints, showing name, location, and the range and bearing between each one, and ETA assuming some SMG. That list shows exactly what depth you should read after traveling the indicated distance.
(4) Then as you proceed, you can record the depth at various log readings, and compare what you see with what you expected. In many cases you can find an approximate position from this comparison. Tide height and sounder draft must be accounted for. With ECS you can set range rings on your departure point to show where you might be as the log reading increases.
With paper charts you can draw a line on transparent paper in the right orientation, and mark off the measured depths using the same miles scale as the chart. Then slide the transparency around till you match your measurements.
These are just a couple chart navigation exercises that are nicely solved by ECS without GPS. There are many. Besides the range and bearing tool for standard plotting, a versatile option that is often overlooked is the ability to set multiple range rings on any mark or waypoint. This has numerous applications, we have shown only one.
The navigation procedures described here are adapted from our new book Inland and Coastal Navigation, 2nd Edition (starpathpublications.com).
David Burch is the director of Starpath School of Navigation, which offers online courses in marine navigation and weather at www.starpath.com. He has written eight books on navigation and received the Institute of Navigation’s Superior Achievement Award for outstanding performance as a practicing navigator.
